The Mikki Device™ Sever’s Solution Casting Instructions
Thank you for your purchase or interest in the Mikki Device™ Sever’s Solution kit. The following video provides an easy to follow step-by-step process on how to prepare the mold for your child’s Sever’s shoe inserts.
Below the video are info boxes with pictures for reference as well. Additionally, each info box can be clicked or tapped to replay that specific section of the video.

Instructional Video
Each section below can be clicked or tapped to go right to that part of the video. We recommend watching the video all the way through first from beginning to end (total time: 5 minutes), and using the bottom sections as reminders and quick links to that part of the video if necessary.

1. Items Included
Items included in your Sever's Solution kit are: a pediatric night splint, instructions for use, 2 packages of STS slip[per socks (1 is a backup), 2 plastic bags, gloves, a spray bottle, and 2 blue slipper clips.

2. Items Needed
The only items you will need from home are a basin or bucket of cool water and a towel to protect the work area.

3. Preparation
Have your child sit on an elevated stool or table so that their feet do not touch the ground. Place the plastic bag over your child's barefoot. Dip the sock completely in the basin of cooled water. Squeeze the sock two or three times like a sponge to make sure the water activates the resin.

4. Applying Slipper Sock
Remove the sock from the basin and gently squeeze out the excess water so the sock is not dripping wet. Gently spread open and carefully apply the sock over the toes with the stitch line directly over the top of the toes. Slide your fingers along the elastic band, and pull the sock up over the back of the heel as high as possible to create a deep heel cup.

5. Use of Slipper Clips
After the sock is in place there may be some bridging across the instep area creating a gap between the sock and the foot. To eliminate this gap, use the slipper clip to bring the sock in closer to the foot. The slipper clip is designed to act like a Mary Jane type of shoe strap to cinch up the instep area. Holding one clip in each hand between the thumb and index finger, direct your attention to the instep of the foot. At the highest point of the arch, hook the clip just under the elastic band and gently pull the band upward to bring the sock in close to the instep area so no gapping takes place.

6. Spraying Sock Tackiness
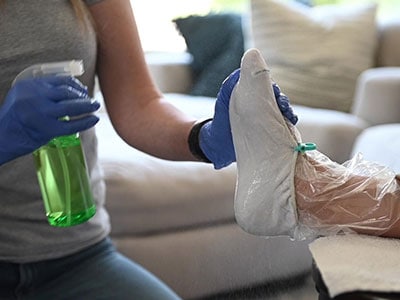
If the resin feels tacky, wet your gloves or mist the sock surface with a fine spray of water from your plastic spray bottle. Keep wetting the slipper sock (and your gloves) until there is no tackiness and the resin becomes slippery.

7. Forming Sock to Foot
Continue massaging the sock to work out any wrinkles. You will begin to feel a slight warming as the resin cures. This is normal. When the warmth begins to level off, you have about 45 seconds of working time left and the foot is ready to be held in neutral position. Hold the foot in the neutral position until the resin hardens.

8. Removing Sock
To remove the hardened sock from the foot, have your child wiggle their toes to break any vacuum seal. Next, using the tips of your fingers, gently pull the heel of the sock downward until the sock is below the bottom of the heel. Gently pull the sock off of the foot using finger pressure on the elastic band just behind the base of the toes. The cured mold should then be teased off the foot. The cured slipper sock mold is ready for shipping in about 60 minutes.

9. Packaging & Shipping
The cured slipper sock mold is ready for shipping in about 60 minutes. Once the mold is cured, follow the instructions you received for the return process to Pediatric Orthotics. If you have any questions, please contact customer support via phone or email, and thank you again for choosing Pediatric Orthotics.

Mikki Device Support Available
Phone and email support available Monday -Friday 9:00 AM to 5:00 PM (MT) at:
(602) 245-7249 and
info@pediatricorthotic.com
